Monday, December 19, 2011

Tights Turned Into Socks

Yesterday I was about to throw away a handful of my daughter's tights.  I was so upset how quickly they wore holes into the bottom part leaving the stocking part still in great shape.  I felt a little guilty throwing them away.  

So instead I made them into socks.  I know socks and tights don't cost much, but I am trying to make things last longer instead of being wasteful and throwing things away.

I had fun making their "new" socks.  I dressed them up with some bows too.  They will look so cute wearing them with their dresses and skirts!  And it only took me about 20 minutes to make 5 pairs.  

I got this idea from Ruffles And Stuff.  The only difference is is that I folded the material again over the elastic. So the elastic would have a casing and wouldn't touch their skin.  I thought it might bother them if it did and this way there were no open seams either so no chance of the material unraveling. 


Snowflake tights.  I dressed them up with a frilly pink bow.


I thought one bow was cute and then thought maybe more would be MORE FUN!

Not all quite in a row, but still FUN!

Thursday, December 15, 2011

Embroidery Hoop Art For Teacher's Gift


Over the past few days I have been trying to decide what to make for my kid's teacher's Christmas gifts.  I was thinking about just giving them snack bags that I made filled with cookies.  But my husband said he didn't think that was a good idea because our daughter's teacher might be diabetic.  Then I was trying to decide on how to embroider their name onto something that would be meaningful for them.  I have really been interested in applique art and the embroidery hoop art.  I came up with this idea of using my machine to embroider applique onto some plain fabric and then use an embroidery hoop as a frame to hang it.  I love the look and hope their teachers do too.  I went to Joanns and picked up 2 hoops for about 2 dollars!  This is a great gift that really cost me only time!


After I finished embroidering I sprayed the fabric with some applique adhesive and then put it on top of another cream fabric. This way you can't see the threads and mess on the back.  After placing the hoop the way I liked I cute the excess fabric witha  razor blade and used fabric glue around the inside edge to hold it all together.  Then I added a bow.  I am definitely not talented in the bow tying area, but I think it turned out good.

Wednesday, December 14, 2011

Grocery Bag Dispenser

My son's teacher asked me if I could make a grocery bag dispenser for her.  I had no idea what she was talking about, but of course I told her I could try.  I looked around for some tutorials that were out there.  His teacher wanted this bag to hold at least 100 grocery bags.  I found this great looking and large grocery dispenser tutorial at Dioramarama.  Here is how it turned out for me.  His teacher was very happy with it and says it holds all of her bags too!  I am glad I can help her out.  She is a great teacher to my son!

Monday, December 12, 2011

Painting Sugar Cookies Recipe


A family tradition of ours is painting sugar cookies instead of frosting them.  It tastes great and the kids have so much fun painting their cookies.  They can also add more detail at this age than they could with frosting.


Sugar Cookie Dough

6 cups flour
3t baking powder
2 cups butter
2 cups sugar
2 eggs
2t vanilla
1t salt

Mix the flour and baking powder.  Then add the rest of the ingredients in order till dough comes together. Then cill in fridge for 1-2 hours.  Roll out on floured surface.  Once all of your cookies are cut out and painted bake at 350 degrees for 8-10 minutes.

Cookie Paint

2 T evaporated milk
4 drops food coloring

Make as many different colors as you want.  Paint onto the cookies and then bake!

Kid's Art Bag With Chalkboard

I have been super busy these last few weeks making things for craft fairs, orders and presents.  I am really having fun making the art bag I designed though.  My girls love theirs and use them at home, on trips and to the doctors.  I made a few extra and they did fairly well at the craft fairs I worked at.  Here are a couple of my favorite ones.


For the comic book fans!


I love the bright colors of Cat In The Hat!

Made for a friend whose grandson loves all things Thomas!


I started using chalkboard fabric. It actually works and gives the bag a great feel!  

Pirates are so popular!  I made another pirate one, but forgot to take a picture of it.


Love Hello Kitty!


Saturday, December 10, 2011

Mexican Chicken Soup Recipe

Here is another favorite soup recipe!  This is actually my husband's favorite soup.  He always says it reminds him of the food he ate growing up.  It's super easy to make, which is my favorite part.  And it is great with cheese quesadillas too, which is probably my kid's favorite part.  If you make it I would love to hear your favorite part of the soup too.  :)


Mexican Chicken Soup

1T olive oil
1 onion
3-4 medium carrots chopped
3-4 medium celery chopped
4 cups chicken broth
Pepper and Salt to taste
3 cups water
2 chicken breast halves
2 cups corn
1/2 cup cilantro
lime wedges
Tortilla chips

In a 4 quart sauce pan heat oil and onion for about 5 minutes.  Add carrots, celery, broth, salt and pepper, water, lime wedges and bring to a boil.  Then add raw chicken, reduce heat to low for 10-15 minutes.  Once the chicken is cooked through remove and shred.  Return to soup, remove the lime wedges and squeeze out juice.  Add corn and cilantro.  Let simmer until you are ready to serve.  Serve with tortilla chips, limes, cheese quesadillas and avocado!  Or however you wish.

White Chicken Chili Recipe

Here is a family favorite!  Easy to make, great on a cold day, and all will love!


White Chicken Chili Recipe

1 pound chicken
1 onion
2t garlic
1T veg oil
2 cans Northern beans- rinse and drain
2 chicken broth cubes in 16oz water
1t salt
1t oregano
1/2t pepper
1/2t cayenne pepper
1 cup sour cream
1/2 cup whipping cream
2 cans green chilies

Saute chicken, onion, and garlic in oil.  Add the beans, chilies, seasons and broth.  Bring to a boil.  Turn to low and then simmer uncovered for 30 minutes.  Remove from heat and stir in sour cream and whipping cream.  Serve immediately!  Great in a bread bowl or over rice too!  Enjoy!

Tuesday, December 6, 2011

Embroidery For Cool Boys

I have finally found embroidery designs that are cool for my son and approved by my husband!  My husband actually found this embroidery site called Urban Threads. If you like punk threads you will love all that is offered here!  I purchased quite a few designs last night and this is what I was able to get done today.  I can't wait to do the rest.


Monday, December 5, 2011

Baby Mary's Quilt


I have been working on this baby quilt for at least a month now!  It is for my husband's friend who recently had a baby girl.  I saw a picture of it somewhere and created my own from what I remembered.


I took some applique flowers that I had on my machine and then created them into boquets.

I was also able to use some baby fabric that I have had for sometime, waiting for the right idea to come along for it.  I fussy cut the cute little baby sayings, made a few pin wheels and mixed in some other squares for the block section.


Then personalized it with the babies name and birthdate.  This would look so cute hanging on the wall above the crib.  I am going to try to figure out how to make this for a boy so I can have one too!  I am so happy with how it turned out.

Saturday, December 3, 2011

Stepping Stones

I have taken a break from blogging.  I realize that I have just started and didn't quite know what I was getting myself into.  I thought this would be a fun way to share all that I make with other crafters.  This thought then turned to my Etsy business and that maybe it would bring more customers.  I was also having fun drooling over what others had made and trying to make their creations too.  I then found myself on the computer way to much!  I was letting my house go and not realizing how much tv my kids were watching.  So I decided to take a break and pray about why I was blogging, if this was good, if I should continue it or just let it go.

I often get discouraged with myself when things around me don't seem perfect.   I focus on my little world and start comparing it to what I see of others.  This is never a good thing.  I have 4 kids! A 7 year old, 5 year old, 3 year old and 11 months old.  My house does not stay clean no matter how hard I try.  Laundry and dishes are constantly piling.  I was loosing sight of what was important.  We can all see our little story so clearly, but loose sight of the larger story, God's story.  In the end all of this will not matter.   What should matter is that I am loving my children and taking good care of them.  Boasting in my works is not important, but boasting in the Lord's is.  You will never be a stepping stone unless you are caught up in the larger story.  I want my life to glorify God and not my works, but His.

My little story is here.  I know it will somehow be used by God for greater purposes.  Right now I am leaning heavily on this verse:

Jeremiah 29:11

New International Version (NIV)
11 For I know the plans I have for you,” declares the LORD, “plans to prosper you and not to harm you, plans to give you hope and a future.

Right now our future is up in the air.  We do not have any plans.  In one year our whole life will change because we will be out of the army.  Right now we don't know where my husband will get a job, where we will live, what we will do.  Then I remember this verse.  It is not our plans that give us a hope and a future.  It is God's plans!  God has plans for our future even though we don't.  He will take care of us and his plans will not harm us.  Even better than that His plans will bring us prosperity and a hope!  God declares this!  He doesn't just say it in a soft whisper or a still small voice.  He declares it!  And this is true for all who trust and obey God.  I want to live in God's story, God's plan for my life!  It has to be better than mine, because I don't have one.  I am trusting in God's plan and because of that trust I have peace over my life.  I am not loosing sleep over the future.  

So what does this have to do with my crafting blog, this is what I am wondering right now.  I love to sew and create.  This hobby/passion of mine has actually helped my family.  I know I don't need to quit this new form of expression either.  I just need to approach it differently.  Not what I can get out of it, but what I can give.  

1 Corinthians 10:31

New International Version (NIV)
31 So whether you eat or drink or whatever you do, do it all for the glory of God.

Wednesday, October 26, 2011

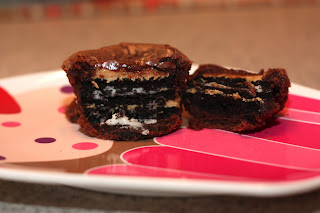
Peanut Butter Oreo Brownie

I found this yummy recipe on Instructables and had to try it.  It has all the ingredients I love!  Oreos, peanut butter and brownie!  I thought it would be fun to do with my 3 year old today.  They were so easy to make and they tasted amazing!


Peanut Butter Oreo Brownie Recipe

1 Box Brownie Mix
Oreo Cookies
Creamy Peanut Butter

Preheat oven to 350 degrees and line a 12 muffin cup baker with paper liners.  I made 18 total. 

Prepare brownie mix according to package directions. Spread 1 teaspoon of peanut butter over 2 Oreo cookies and stack them on top of each other. Place oreo stacks into the cupcake lined muffin cups. 

Spoon some brownie batter over the oreos till the cookies are covered. 

Bake for 20 minutes, until brownies are cooked through. I had to bake mine for 25 minutes.  Let cool completely then serve. (I couldn't wait for them to "completely" cool!  They smelled so good, I was too tempted. They tasted great!)


The first batch out of the oven!


ENJOY!

Saturday, October 15, 2011

Trick or Treat Sack

I have a friend with older kids and she wanted a trick or treat bag that was more like a pillow case with handles.  I found this pattern on Earthgirl for a Quick Carrier bag and thought it was perfect.  The pattern only gives you a tiny drawing and the measurements so that you can make it yourself.  I finally found a way to use all the math I learned in school!  I love geometry! :) 
Math skills at work!

I didn't want it to be this big, this pattern is more for a grocery bag, so I measured down about 12 inches and then cut.

I had to take about an inch off the sides until it looked good.  Then I cut out a felt pumpkin face.

Time for Trick or Treating!  Lots of candy can fit in this bag!


I thought the tutorial was really easy to read.  The only changes I made, besides the size, was that I lined the whole thing.  I thought it would last longer through the years of use.  


New England Apple Pie Recipe


I love apple picking in the fall.  I am from Arizona and never had the chance to pick anything fresh from a farm or grove growing up.  So I am as excited as my kids are about going to real apple orchards, strawberry fields, farms and pumpkin patches.  I also love apple pie in the fall.  This is a spice apple pie and it just tastes and feels like fall!

Apple Pie Recipe

1 cup sugar
1 tsp. cinnamon
1/4 tsp. salt
1/2 tsp ginger
1/4 tsp nutmeg
2 T flour
3 Strong (decaf) Tea Bags
1 T lemon juice
butter (1/2 or whole stick)
4 cups peeled and sliced apples

Combine and mix well all the ingredients except the apples and butter.  Cover the pie crust bottom with a thin layer of apples then sprinkle the dry mixture over them.  Continue this till all ingredients are gone.  Dot top with butter and then cover with pie crust - pinch edges and cut slits in the top.

Bake at 350 degrees for 40-50 minutes.  Put and egg wash on top and then broil till brown.

Pie Crust (if you want to go all out)

2 1/4 cups flour
3/4 tsp salt
3/4 cup butter crisco stick
5 or 8 T cold water

Sift flour and salt.  Cut in shortening till pea sized crumbs.  Add cold water slowly till all damp.  Work dough with hands to form 2 balls.  Place each in their own wax paper and refrigerated till cool.  Roll out dough when ready to use.


Halloween Skirts And Frayed Flower

I was up all night last night determined to get two skirts and matching shirts made!  I wanted my girls matching and all dressed up for the pumpkin patch. (I bought an already made shirt for my oldest boy and made a little boy shirt for my baby, they were not forgotten.)  I made these twirly skirts with Riley Blake fabric.  I love them! I Love the colors of fall.  I bought the shirts at Target and took matching fabric from the Riley Blake Halloween Panel and cut out the pumpkins and appliquéd them on.  Then I found this great tutorial on frayed flowers from Maize Hutton and used a scrap I was going to throw away to dress the shirt up.  I love it!  It really adds a lot to the plain shirts.  I think I found my new favorite thing!